System Simplifies Probing Operations On VMCs
Few machinists will dispute the merits of probing for speeding part setup, setting tool offsets and performing in-process inspection . . . at least in theory. In practice, however, probe systems often have been viewed as difficult to use and expensive to buy.
Share


Few machinists will dispute the merits of probing for speeding part setup, setting tool offsets and performing in-process inspection . . . at least in theory. In practice, however, probe systems often have been viewed as difficult to use and expensive to buy. As a result, they've become tools used primarily by experienced programmers in high-production environments.
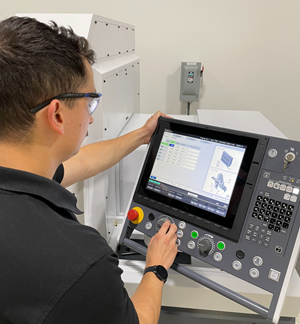
The Visual Quick Code probing system from Haas Automation, Inc. (Oxnard, California) is designed to make probing effective and more affordable to a wide range of users. The system was recently developed in conjunction with Renishaw, a leader in probe systems.
Available as an option on new Haas vertical machining centers, the system consists of a spindle probe, a contact tool setting probe, an optical receiver and Renishaw's Inspection Plus software. The system is installed and calibrated at the machine tool builder's factory.
The system features a conversational programming system that uses a graphical interface and a question/answer format to create G-code programs. It does not require knowledge of macro programming. The machinist creates probe routines for tool setting and part setup by entering basic information with the keyboard on the CNC.
For example, to probe the external corner of a workpiece and establish a work offset, the machinist selects the appropriate graphical template, jogs the spindle probe to within 0.5 inch of the selected corner and enters the following information: work offset number (for example, G54), approximate X width of the material, approximate Y width of the material and which corner to probe. Once this information is entered, a pop-up dialog box prompts the machinist to choose where to output the G code: to a new program, to an existing program or directly to manual data input (MDI). Once a destination is selected, the G code is generated automatically for the probe routine.
If the G code is used as direct data input, the machinist hits Cycle Start to probe the workpiece and automatically enter the correct offsets into the control. If the machinist chooses to create a new program, the program can be called up immediately to start the probe routine, or saved for later use. If the G code is inserted into an existing part program, it can be used to probe each workpiece and update the offsets prior to machining.
The system also has templates for finding the center of a workpiece, probing a bore or boss, measuring bore-to-bore or boss-to-boss and probing a web or pocket.
The procedure for setting tool offsets follows a pattern very similar to the procedure for setting work offsets, with templates for automatically measuring tool length, tool diameter or both. The machinist can measure tools individually or create a probe routine to check a carousel of tools.
The company points out that despite the very favorable pricing, the system is considered a full-featured, high-resolution probe system capable of many other probing tasks in addition to tool and part setting. Using macros (included) and advanced programming methods, it can perform such operations as in-process tool and part inspection, first-off part measurement, automatic compensation for thermal changes and checking for worn or broken tools. This functionality reduces operator-induced variations in the process and builds confidence in unattended machining processes.
Related Content
5 Reasons Why You Should Know How to Write Custom Macros
Custom macros enhance what can be done in G-code programs, giving users the ability to code operations that were previously not possible.
Read More2 Secondary Coordinate Systems You Should Know
Coordinate systems tell a CNC machine where to position the cutting tool during the program’s execution for any purpose that requires the cutting tool to move.
Read MoreCNC-Related Features of Custom Macro
CNC-related features of custom macro are separated into two topics: system variables and user-defined G and M codes. This column explores both.
Read MoreSwiss-Type Control Uses CNC Data to Improve Efficiency
Advanced controls for Swiss-type CNC lathes uses machine data to prevent tool collisions, saving setup time and scrap costs.
Read MoreRead Next
Last Chance! 2025 Top Shops Benchmarking Survey Still Open Through April 30
Don’t miss out! 91ĘÓƵÍřŐľÎŰ's Top Shops Benchmarking Survey is still open — but not for long. This is your last chance to a receive free, customized benchmarking report that includes actionable feedback across several shopfloor and business metrics.
Read MoreMachine Shop MBA
Making Chips and 91ĘÓƵÍřŐľÎŰ are teaming up for a new podcast series called Machine Shop MBA—designed to help manufacturers measure their success against the industry’s best. Through the lens of the Top Shops benchmarking program, the series explores the KPIs that set high-performing shops apart, from machine utilization and first-pass yield to employee engagement and revenue per employee.
Read MoreAMRs Are Moving Into Manufacturing: 4 Considerations for Implementation
AMRs can provide a flexible, easy-to-use automation platform so long as manufacturers choose a suitable task and prepare their facilities.
Read More


